A worked example · Updated October 8, 2026
How to print double-sided flashcards
Put a term on the front and its definition on the back—without manually rearranging a spreadsheet. This walkthrough makes eight cell biology cards on one A4 sheet. You can use the same steps for vocabulary, questions and answers, or your own study notes.
By Printable Flashcard Maker. The screenshots and downloadable PDF come from an actual browser walkthrough of a simulated classroom task. They demonstrate the digital output, not a physical printer alignment test.
1. Prepare one row per flashcard
Imagine you are preparing a short cell biology review. You already have eight terms and definitions in Excel or Google Sheets. Keep each term and its matching definition on the same row: column 1 is Front; column 2 is Back. Do not sort just one column, or the answers will no longer match.
| Front | Back |
|---|---|
| Nucleus | Contains most of a eukaryotic cell's DNA. |
| Cell membrane | Controls what enters and leaves the cell. |
Download the complete 8-card CSV. Replace the example rows with your own content, or use them to follow along. This is a small practice set, not a complete cell biology syllabus.
For an existing spreadsheet, copy the two columns including the header, or export as CSV UTF-8. The maker accepts pasted tables and CSV / TSV files; it does not open XLSX workbooks directly.
Have extra columns, accented text or a CSV that will not import cleanly? Follow the Excel and Google Sheets import walkthrough for column mapping and file-format fixes.
2. Import the list and check the pairs
Open the flashcard maker in another tab on a desktop browser. If you already have a draft, use Save cards to keep an editable ZIP backup. For a separate practice set, use New cards after saving.
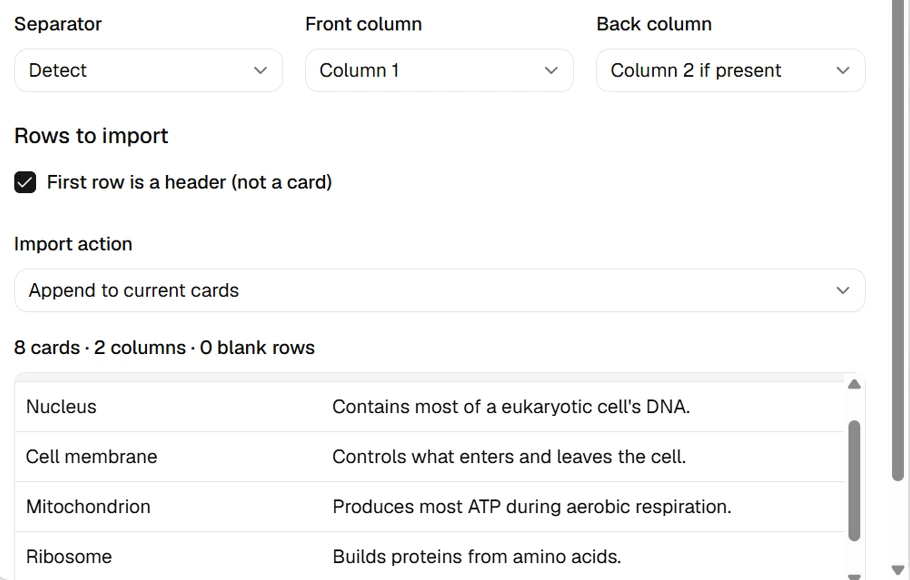
- Click Paste / import. Upload the example CSV, or paste your two-column list into Or paste your table.
- Keep Separator: Detect, Front column: Column 1 and Back column: Column 2 if present.
- Check First row is a header (not a card). You should see 8 cards · 2 columns · 0 blank rows, not nine cards.
- Read the mapped preview. Nucleus must be paired with the DNA definition. Keep Append to current cards to avoid replacing existing work, then click Add 8 cards.
3. Set up eight double-sided flashcards per sheet
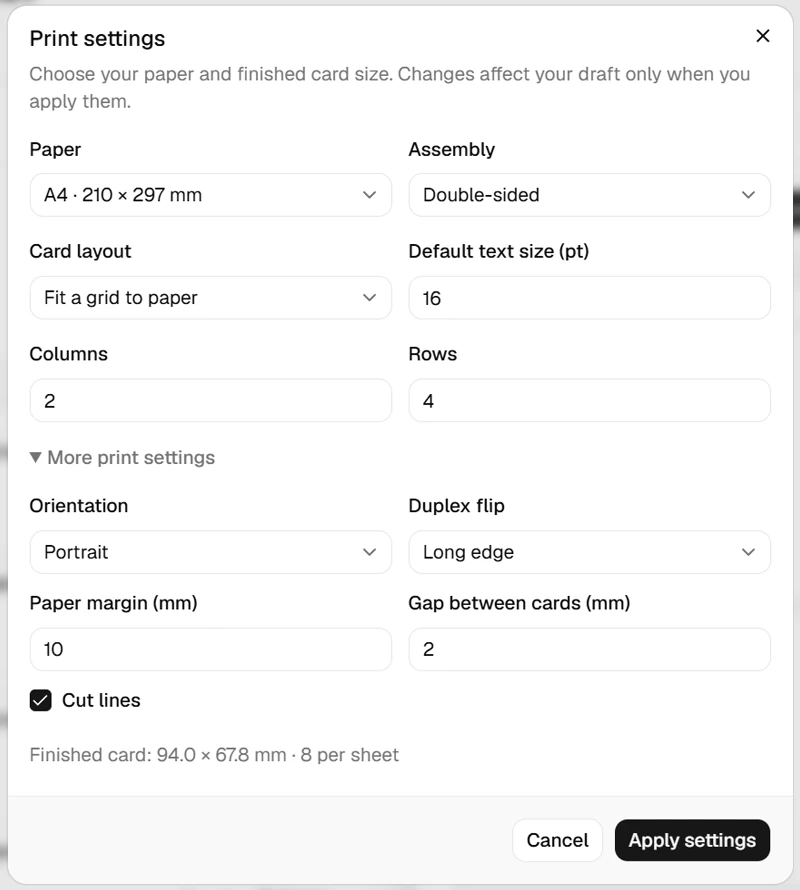
Click the paper/mode button beside Prepare print file to open Print settings. It initially reads “A4 · Single-sided”. Use these settings for the example:
| Setting | Choose |
|---|---|
| Paper / Assembly | A4 / Double-sided |
| Card layout | Fit a grid to paper |
| Columns / Rows | 2 / 4 |
| Default text size | 16 pt |
| More print settings → Orientation / Duplex flip | Portrait / Long edge |
| Paper margin / Gap between cards | 10 mm / 2 mm |
| Cut lines | On |
Click Apply settings. This produces eight cards approximately 94 × 67.8 mm, not 3 × 5 inch cards. If you use US Letter paper, choose it here before exporting and select Letter again in the printer dialog; the fitted card dimensions will change.
4. Why the back page looks reversed
The PDF contains two pages for one physical sheet: page 1 has the terms; page 2 has the definitions. For this portrait, long-edge layout, the maker reverses the left/right positions on the back page. It does not reverse the letters.
PDF page 1 · Fronts
PDF page 2 · Backs
In the actual sample, Nucleus is at the top left of the front page. Its DNA definition is at the top right of the back page. Do not “fix” that order in your spreadsheet—the maker has already arranged it for printing.
The flip setting describes the edge of the paper, not whether each little card looks horizontal or vertical. If you choose a different flip edge in the maker, download a new PDF and use that same edge at the printer.
5. Download the PDF and print the two pages together
Keep Cards to print: All cards. Click Download PDF to save your file, or Prepare print file and then Open for printing · 8 cards to open the prepared PDF. After changing cards or print settings, generate the file again.
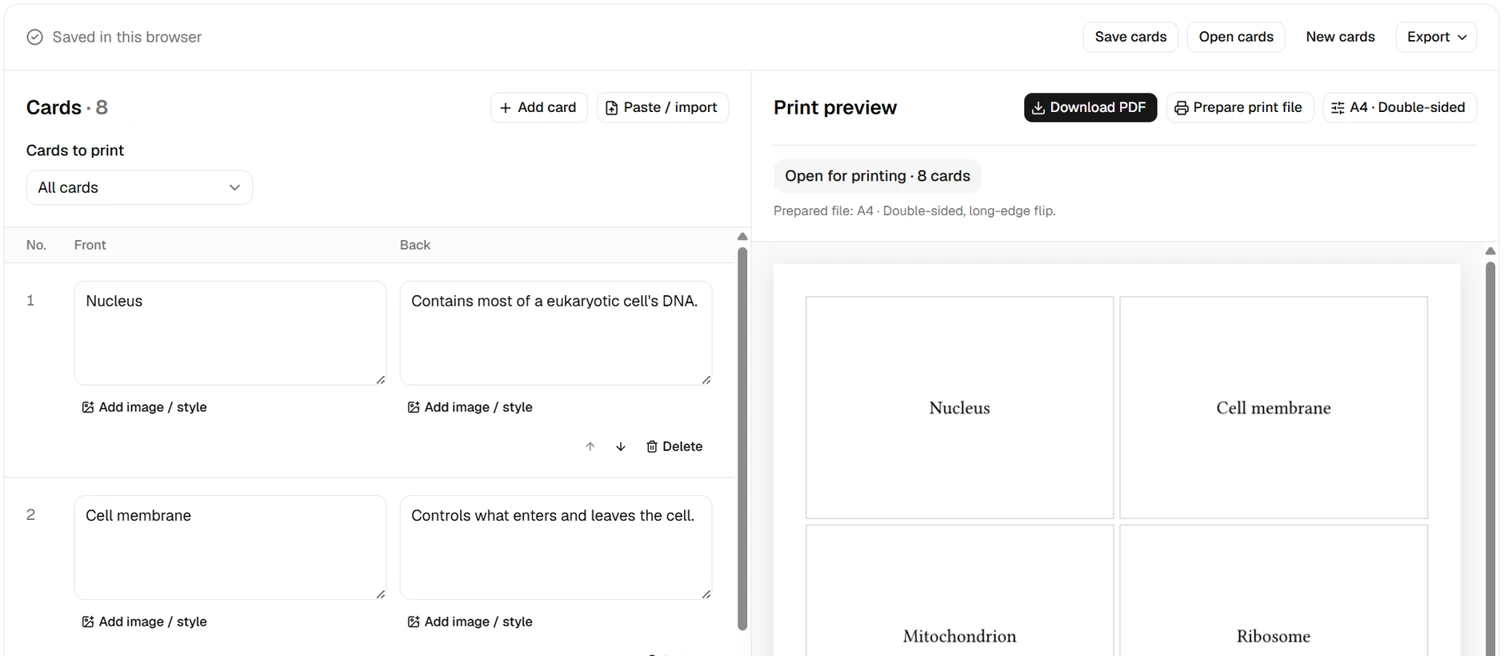
Open the generated example PDF · A4, 8 cards, 2 pages. Use it to compare the page order or follow the printing steps without entering data.
Open the PDF's print dialog and select your physical printer. Set:
- Paper: A4 for this sample, and portrait orientation.
- Scale: 100% or Actual size, rather than Fit or Shrink.
- Pages per sheet: 1. The PDF already contains eight cards per page; do not select eight pages per sheet or booklet printing.
- Print on both sides → Flip on long edge. Keep pages 1–2 in their original order and print one copy first.
Before cutting, turn the sheet like a book and check that each term has the correct answer behind it. For example, Nucleus should match the DNA definition. Check the top and bottom rows, then cut around the cards using the guides. With a longer deck, keep all PDF pages in order—including any blank back pages—so later pairs do not shift.
Printer dialog labels vary by device and PDF viewer. Automatic duplex also depends on the printer and paper it supports. Microsoft's duplex printing guidance explains automatic versus manual printing and why reloading direction needs a printer-specific check.
Fix the problem you actually see
| Symptom | Check first | What to do |
|---|---|---|
| A term has the wrong definition in the editor. | Source rows and Front / Back column mapping. | Repair the pair before exporting. Changing the printer flip cannot repair mismatched source data. |
| The editor is correct, but definitions land behind other terms. | PDF page order, flip edge and manual reload direction. | Use the original two-page PDF, one page per side, and match the maker's flip setting. Do not manually rearrange the back page. |
| Backs are upside down. | Printer flip edge versus the prepared PDF setting. | For the supplied PDF, choose long-edge flip. If you deliberately change the maker's flip setting, regenerate the PDF too. |
| All backs are slightly shifted, but pairings are correct. | Paper size, scale, paper feed and the printer's duplex registration. | Match paper and 100% scale first; consult the printer's alignment settings for persistent offsets. The maker arranges pairs but does not calibrate mechanical feed drift. |
| Cards are too small or clipped. | Fit/Shrink, pages-per-sheet, paper mismatch and printable margins. | Use one PDF page per side and matching paper. If the printer clips the outer area, increase Paper margin in the maker and export again. |
| There is an extra Front / Back card, or no answers. | Header checkbox, Back column and Assembly. | Skip the header, map the answer column, and use Double-sided. Single-sided intentionally prints only fronts. |
No double-sided printer? Use a fold-over layout
Choose Assembly: Fold-over and generate a new PDF. Each front and back is placed in one pair on the same printed side. Print single-sided, cut each pair out as one piece, fold at the dashed line and glue the halves. Do not cut the two halves apart first.
The finished card size can change when switching modes; check the size shown in Print settings. With the same 2 × 4 grid, each fold-over pair uses the space previously occupied by one single face.
If you prefer manual double-sided printing
For this two-page sample, print page 1 single-sided on one sheet, mark its top edge lightly, then reload it according to your printer's instructions and print page 2 on the unused side. Confirm both pairing and orientation before repeating. Feed direction and face-up/face-down behavior differ between printers, so there is no universal “put the stack back this way” instruction.
Before you print your own set
Can I make 3 × 5 inch flashcards instead?
Yes. Choose Card layout: 3 × 5 in · fixed size, then check the resulting cards-per-sheet count. Do not also expect the eight-up example layout to fit. Print at Actual size on full A4 or Letter sheets and cut out the cards; this is not a preset for feeding loose index cards or Avery stock.
Can I edit the cards after downloading the PDF?
Edit the current draft in the maker, then export again. To keep an editable backup with settings and pictures, choose Save cards for a ZIP and restore it later with Open cards. The print PDF is the output, not the editable draft.
Ready for your own list? Make your printable flashcards. Keep each pair on one row, match the PDF and printer settings, and check one sheet before printing the full set.